DIY Closet Organizer with Drawers: A Smarter Way to Maximize Storage

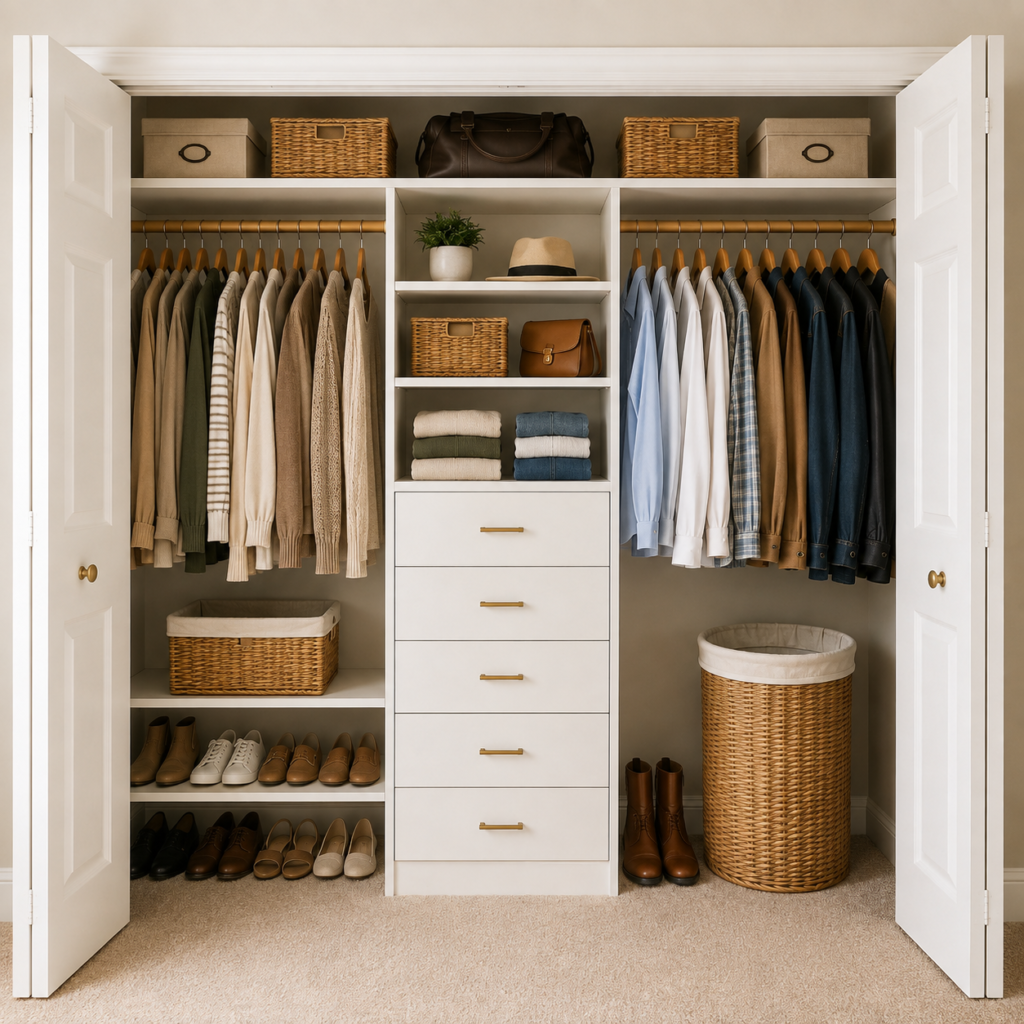
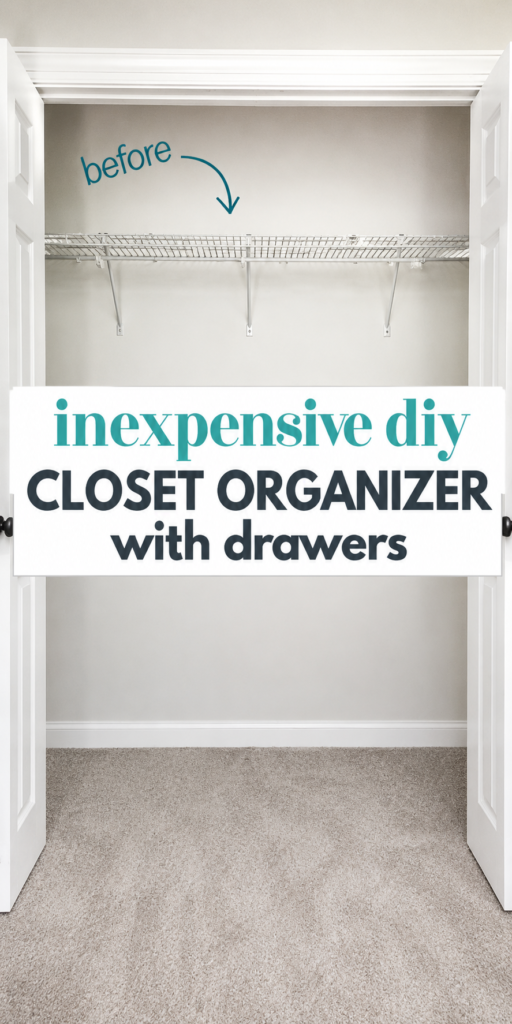
A basic reach-in closet can look surprisingly large when it is empty and still feel frustratingly small once you start using it. The problem usually isn’t the square footage. It’s how little of the available height, depth, and wall space is actually working for you.
A DIY closet organizer with drawers solves that problem by dividing one open closet into several useful storage zones. Instead of relying on a single hanging rod and one high shelf, you can combine closed drawer storage, adjustable shelving, hanging space, shoe storage, baskets, and an upper shelf in one built-in-style system.
The design in this tutorial centers around a vertical drawer-and-shelf tower with hanging storage on either side. It works especially well in bedroom closets where folded clothing, accessories, shoes, laundry, and hanging garments all need to share the same space.
The important part is not copying one fixed set of dimensions. The organizer should be planned around your closet width, depth, ceiling height, baseboards, doors, and storage habits.
By the end of this project, you’ll know how to measure the space, plan the layout, build the main organizer, install drawers and shelving, and create a closet that stays easier to organize long after the makeover is finished.
What Wasn’t Working in This Closet
A traditional closet setup usually gives you one long hanging rod with a shelf above it.
That layout works well when almost everything you own needs to hang. But for many bedrooms, that isn’t the case.
T-shirts, socks, underwear, shorts, workout clothes, pajamas, accessories, and other everyday items are usually better stored folded. When the closet doesn’t offer drawers or dedicated shelving, those items end up somewhere else in the room—or piled into baskets that are difficult to maintain.
Another problem is unused vertical space.
The lower half of many closets remains mostly empty beneath short hanging garments, while the upper shelf becomes an overloaded catch-all.
A better layout should make use of the entire closet from floor level almost to the ceiling.
The Plan for This Closet Organization Project
The goal is to divide the closet into clear functional zones rather than filling it with as many shelves as possible.
1. Create a central storage tower
The middle section becomes the main folded-clothing zone.
Drawers keep smaller items hidden while shelves above them can hold baskets, folded clothing, accessories, or frequently used items.
2. Keep hanging space on both sides
Installing hanging rods beside the center tower preserves room for shirts, jackets, dresses, and other garments that need hangers.
One side can also remain more open for longer clothing.
3. Use the bottom of the closet
Low shelves create an easy place for shoes, bags, storage baskets, or folded bulky items.
4. Add a continuous upper shelf
A high shelf stretching across the closet creates useful storage for seasonal items, extra bedding, luggage, memory boxes, and things that don’t need daily access.
5. Keep the layout flexible
Not every household needs the same balance of shelves and hanging space.
Design the side shelves so you can reduce them if you need more hanging space later.
Organization Tip:
Plan around what you actually own—not around what looks best in an empty closet.
What You’ll Need
Building Materials
Depending on your closet dimensions, you may need:
- 3/4-inch MDF or cabinet-grade plywood
- 1/4-inch plywood for drawer bottoms
- Wood strips or boards for shelf supports
- Closet rods
- Closet rod sockets
- Drawer slides
- Drawer pulls or knobs
- Wood screws
- Pocket-hole screws if using pocket-hole construction
- Wood glue
- Wall anchors or structural fasteners when required
- Small brackets for securing the organizer
- Primer
- Paint
- Wood filler
- Sandpaper
Tools
Useful tools include:
- Tape measure
- Pencil
- Carpenter’s square
- Level
- Drill/driver
- Circular saw or track saw
- Pocket-hole jig
- Orbital sander
- Oscillating multi-tool
- Nail gun or hammer
- Hardware jig
- Stud finder
Wear appropriate eye, hearing, and respiratory protection when cutting or sanding sheet goods, and follow the safety instructions for the tools and materials you use.
Measure Before Building Your Closet Organizer
This is the stage that determines whether the rest of the project goes smoothly.
Measure the closet in several places instead of assuming the walls are perfectly straight.
Record:
- Interior width
- Interior depth
- Floor-to-ceiling height
- Door opening width
- Baseboard height and thickness
- Position of wall studs
- Depth available before shelves interfere with doors
- Clearance required for drawers
- Space needed for hanging clothes
Choose the organizer depth carefully
For many reach-in closets, a storage depth somewhere around 12 to 16 inches can provide useful shelving without making the center section feel excessively bulky.
But don’t select the depth until you’ve checked your own door clearance and closet depth.
Plan the center tower
A center tower roughly 24–30 inches wide can work well in many closets, but this is not a universal measurement.
If your closet is narrow, reduce the tower width so the side areas remain accessible.
If your closet is wide, you may want a wider center unit or additional shelving.
Test the design before cutting
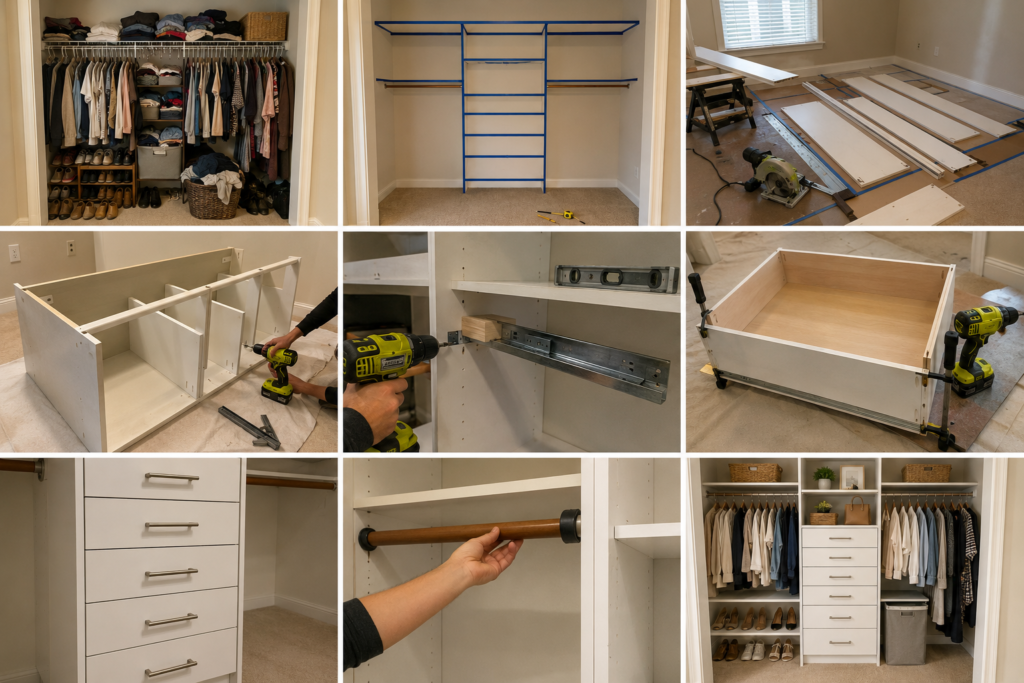
Use painter’s tape to mark the proposed shelves, drawers, and hanging rods directly on the back wall.
This simple step makes it much easier to notice awkward proportions before you buy or cut materials.
Small-Space Tip:
Open the closet doors while testing your layout. A shelf or drawer that technically fits inside the closet can still be frustrating if the door blocks access.
How to Build a DIY Closet Organizer with Drawers
Step 1: Empty and Remove the Existing Closet System
Remove clothing, baskets, shoes, hangers, and anything stored on the existing shelf.
Take out the old rod and shelving.
Patch unwanted holes and clean the walls before installing the new organizer.
This is also the best time to repaint the closet interior if it needs refreshing.
Starting with a completely empty space also makes your measurements more reliable.
Step 2: Finalize Your Layout
Before cutting lumber or sheet goods, decide exactly what the center section needs to hold.
Ask yourself:
- How many drawers would actually be useful?
- Do I need shallow drawers for accessories?
- Do I need deeper drawers for clothing?
- How much long-hanging space do I need?
- Where will shoes go?
- Do I want a hamper inside the closet?
- Which items need shelves?
You might use three deeper drawers with two shallower drawers above them, for example, or change the configuration entirely.
The layout should respond to your storage needs.
Step 3: Cut the Main Organizer Pieces
Cut the vertical panels first, followed by the fixed shelves and upper shelf.
Label each piece with painter’s tape as you work.
Something simple such as:
- Left panel
- Right panel
- Lower shelf
- Drawer divider
- Upper shelf
can prevent confusion later.
If you’re using MDF, sand cut edges smooth before painting.
For plywood, consider edge banding on exposed edges for a more finished built-in appearance.
Budget Tip:
Plan your cut layout on paper before cutting full sheets. Efficient cuts can reduce the number of sheets required and leave larger reusable offcuts.
Step 4: Prime and Paint Before Installation
Painting large panels while they are flat is usually much easier than reaching into narrow corners after installation.
Apply primer suitable for your chosen material and allow it to dry according to the manufacturer’s directions.
Then apply your finish coats.
You can leave final touch-ups until the organizer is installed.
For closets, a durable washable finish is practical because shelves and drawer fronts receive regular contact.
Step 5: Assemble the Center Tower
Lay one vertical side panel flat on a clean work surface.
Mark every shelf location carefully.
Use a carpenter’s square to transfer the marks across the panel.
Attach the shelves according to your chosen joinery method.
Pocket-hole construction can keep many fasteners hidden, while other cabinet-building methods can also work.
Before fastening the second side panel permanently, measure diagonally across the unit in both directions.
Matching diagonal measurements are a useful indication that the assembly is square.
This becomes especially important once drawers are added.
Step 6: Deal With the Baseboards
For a built-in appearance, the center organizer should sit securely against the wall.
Baseboards can prevent that.
One option is to carefully remove or cut out only the section behind the organizer.
Another is to notch the organizer around the baseboard.
Which solution is better depends on whether you want the organizer to feel permanent and whether you expect to remove it later.
Step 7: Position and Secure the Main Unit
Move the assembled tower into the closet.
Center it according to your layout and confirm that it is:
- Plumb
- Level
- Square
- Positioned correctly relative to the doors
Do not rely on the organizer simply standing in place.
Because opening drawers shifts weight toward the front, the completed unit should be securely anchored using an appropriate method for your wall construction.
Whenever possible, structural connections should go into wall framing.
Step 8: Install the Top Shelf
Measure the final opening again before cutting your long upper shelf.
Walls can be slightly out of square.
Avoid cutting the shelf so tightly that there is no room to maneuver it into place.
Install wall supports as needed and check the shelf with a level before fastening it.
The upper shelf can become one of the most useful parts of the finished closet for low-frequency storage.
Step 9: Add the Side Shelves
Now build the lower storage zones on either side of the center tower.
One side may need more shelves while the other may need more open hanging space.
That asymmetry is perfectly fine.
An effective closet is designed around function, not visual symmetry.
Secure wall-side shelf supports appropriately and attach the inner shelf edge to the center structure.
Keep enough floor clearance for shoes, baskets, or a hamper.
Step 10: Build the Drawer Boxes
Measure the actual drawer opening after the main organizer is assembled.
Don’t rely only on the original drawing.
Drawer slide manufacturers specify the clearance required for their hardware, so size your drawer boxes according to the slides you are using.
Construct each box square and check the diagonal measurements before attaching the bottom.
A thin plywood panel works well for many drawer bottoms when properly supported and installed for the intended load.
The drawer front can be installed later, so the drawer box itself doesn’t need to provide the finished appearance.
Step 11: Install the Drawer Slides
Drawer installation is one of the steps where small errors become very noticeable.
Both slides need to remain:
- Level with each other
- Parallel
- At the same depth
- Properly spaced
Spacer blocks made from scrap wood can make repeated slide placement much easier.
Install the lowest drawer first and work upward.
After installing each drawer, open and close it several times before moving to the next one.
Fix alignment problems immediately rather than hoping the drawer fronts will hide them.
What I’d Do Differently:
Spend extra time setting up repeatable spacers for the drawer slides. A few minutes making accurate guides can save far more time adjusting misaligned drawers later.
Step 12: Add the Drawer Fronts and Hardware
Cut drawer fronts slightly larger than the visible drawer boxes so they create consistent reveals across the organizer.
Lay out all the fronts before permanently attaching any of them.
Use temporary spacers to create even gaps.
A hardware jig can also make it much easier to keep handles aligned across several drawers.
Once everything looks correct, secure the fronts from inside the drawer boxes and install the final hardware.
Step 13: Install the Closet Rods
Determine the rod height based on the garments that will hang in each section.
One side can be configured for shorter garments while another provides more vertical clearance.
Cut each rod to fit the actual finished opening.
Check that rod supports are securely attached before loading them with clothing.
The Finished Organized Closet
Instead of one large undefined cavity, the closet now has several clearly defined storage zones.
The drawers can hold folded clothing and smaller everyday items.
The upper shelves can handle baskets and accessories.
The lower shelves provide a dedicated home for shoes.
Hanging rods preserve easy access to shirts, jackets, dresses, and other hanging garments.
The high shelf uses space that would otherwise sit mostly empty.
Most importantly, the storage system remains understandable.
You don’t need a complicated organizing routine because each category already has a logical place.
How Much Does a DIY Closet Organizer Cost?
The total depends heavily on closet dimensions, material choice, drawer hardware, and the number of drawers.
A reasonable planning budget might include:
| Item | Example Budget Range |
|---|---|
| MDF or plywood | $90–$180 |
| Drawer slides | $30–$80 |
| Closet rods and brackets | $20–$50 |
| Drawer hardware | $15–$50 |
| Screws, brackets and fasteners | $15–$35 |
| Primer and paint | $25–$60 |
Estimated total: approximately $195–$455, depending on materials you already own and local pricing.
These figures are planning estimates rather than fixed prices.
Using scrap wood for supports, reusing existing paint, or finding inexpensive drawer hardware can reduce the total significantly.
How Long Does This Project Take?
A closet organizer with drawers is more involved than a simple shelf-and-rod makeover.
A realistic DIY schedule may include:
- Demolition and preparation: 1–2 hours
- Measuring and layout: 1–2 hours
- Cutting and sanding: 2–4 hours
- Main structure assembly: 2–4 hours
- Drawer construction: 2–4 hours
- Installation: 2–3 hours
- Hardware and adjustments: 1–2 hours
Painting and primer drying time can extend the project over several days even when active construction time is much shorter.
Common DIY Closet Organizer Mistakes to Avoid
Building Before Measuring the Door Opening
The organizer can fit inside the closet but still be difficult to install if the assembled piece won’t pass through the doorway.
Plan how the components will physically enter the closet.
Making Shelves Too Deep
Deep shelves aren’t automatically better.
When shelves become too deep, small items disappear behind one another.
Ignoring Drawer Clearance
Drawer slides require precise side clearance.
Choose your hardware before finalizing drawer dimensions.
Forgetting the Baseboards
Baseboards can push the organizer away from the wall and alter your measurements.
Plan for them from the beginning.
Skipping Wall Anchoring
A tall storage unit with open drawers can become front-heavy.
Secure the structure appropriately.
Designing for Perfect Symmetry
Your wardrobe probably isn’t symmetrical.
The closet doesn’t need to be either.
Give hanging space, drawers, and shelves to the categories that actually need them.
Filling Every Shelf Immediately
Leave some open capacity.
An organization system is easier to maintain when it has room for normal changes in clothing and storage.
How to Keep Your New Closet Organized
Once the organizer is installed, avoid creating dozens of tiny categories.
Keep the system simple.
You might divide drawers into:
- Socks and underwear
- T-shirts
- Shorts
- Pants
- Sleepwear
Use baskets for categories that change frequently.
Keep everyday clothing between roughly waist and eye level whenever possible.
Reserve the highest shelf for things you access less often.
And give the closet a quick reset every week.
Five minutes returning shoes, clothing, and baskets to their proper zones is much easier than doing another complete closet overhaul several months later.
Frequently Asked Questions
Is it cheaper to build your own closet organizer?
It can be, particularly when you use MDF, basic plywood, standard drawer slides, and inexpensive hardware. The final cost depends on closet size and the number of drawers. DIY also allows you to customize the layout without paying for every upgrade separately.
What is the best depth for DIY closet shelves?
There is no single correct depth. For many reach-in closet organizers, approximately 12–16 inches can provide practical storage without making shelves excessively deep. Always check your closet depth, doors, hanging clothes, and drawer clearance before choosing a final measurement.
Should I use MDF or plywood for a closet organizer?
Both can work. MDF provides a very smooth painted surface and is often economical, while plywood is generally lighter and holds fasteners differently. Compare local prices, the finish you want, and your preferred construction method before buying materials.
Can I add drawers to a DIY closet organizer?
Yes. A central drawer tower is an efficient way to combine folded clothing storage with shelves and hanging rods. Plan the drawer slides before calculating drawer-box width because the hardware requires specific clearance.
How can I maximize vertical space in a small closet?
Use several storage heights instead of one rod. Combine low shoe storage, drawers, shelves, hanging space, and an upper shelf. The goal is to assign each vertical zone a purpose without making frequently used items difficult to reach.
Does a closet organizer need to be attached to the wall?
A tall organizer—especially one containing drawers—should be securely installed using a method appropriate for the structure and wall type. Drawers can shift weight toward the front when opened, making proper attachment particularly important.
How do I make a DIY closet look built in?
Fit the center structure neatly against the wall, address baseboard gaps, keep shelf spacing consistent, hide exposed sheet edges, use matching paint, align drawer fronts carefully, and minimize visible fasteners.
Want This Closet Look Without Building It From Scratch?
You can get a similar organized setup with a ready-made closet system that includes drawers, shelves, and hanging space—without starting a full DIY build.
→ Check Price & See It on Amazon
→ Check Price & See It on Amazon
Perfect for anyone who wants more closet storage with less measuring, cutting, and installation work.
As an Amazon Associate, I may earn from qualifying purchases at no extra cost to you.